In this post, I’d like to demonstrate how using the “Dodge and Burn” tool can dramatically enhance your subject’s eyes in a photograph.
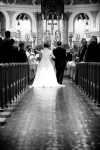
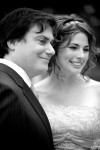
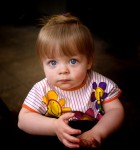
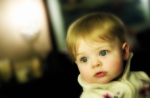
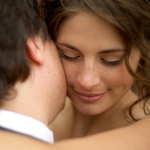
First, let’s start with an original image.

Original Image - No Adjustments
This image was captured in natural lighting, with a strong light (the sun in this case) behind the subject. Now, there’s nothing wrong with that – but you really don’t get the full color out of the eyes. Many photo editing software applications have a “Dodge and Burn” tool. Photoshop and Aperture are my favorite applications for editing my work. For this image, I’ll be using Aperture 2.
First, I normally make any adjustments to Exposure and Contrast that I would like to make. Those adjustments are outside the scope of this How To – but are still very important to the overall final image enhancement. I’ll show those adjustments in the final image.
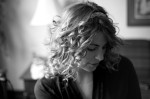
Here are the eyes with no adjustments- close up.

No Changes
Now, using Dodge and Burn – I will carefully lighten (dodge) the colored part of the iris, avoiding the pupil or the darker, outer edge of the iris (called the Scurf Rim in Iridology). I make an extra pass with the tool around the Iris, to intensify the color.

One Iris Lightened

Both eyes have been lightened in the Iris only.
After using dodge and burn to lighten the color in the iris of the eyes – I also like to do a few more things. Next, I lighten the whites of the eyes – very carefully, and just slightly. Pay attention, so that you do not let the tool lighten anything other than what you’re intending to. If you make a mistake, start over. Most applications also have an ‘undo’ function.

Both Irises lightened and both whites have been lightened using the dodge tool.
Finally, I normally darken (burn) the pupil, and the Scurf Rim ever so slightly – just to enhance their darker characteristics. Let’s take a look –

After editing both eyes completely using Dodge and Burn tool.
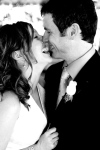
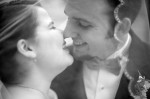
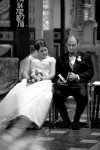
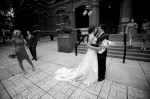
Finally, here’s the full image – with all the changes – and a few tweaks to the exposure and color temperature.

Full image - all changes made
When you look at all these images- you’ll notice that the changes to the eyes are somewhat subtle. That’s a good thing. If you’re making changes that are way too dramatic, then your final image may appear too doctored or ‘cooked’ as I like to call it. If you do a nice job with this technique, your photo will really pop – but it won’t be obvious what you did! Good luck – I’d love to see some examples of your before and after images.